Category Archives: Bachelorette Party

Here Comes Wedding Season!

For five to ten years after college, a strange phenomenon occurs. What used to be Spring, Summer, and Fall becomes one large season – Wedding Season! For some, this season comes with a plethora of wedding-related activities: engagement parties, showers, bachelorettes… You get the idea. Walk into any party store and you will find at least one full aisle dedicated to these events. However, if you’re anything like me, this aisle never seems to have what you’re looking for. For many, this can be solved by looking on Etsy. For some, crafting is the only solution. In honor of the beginning of this fabulous season (this post was written on a flight to a wedding, in fact), I thought I would share some fun ideas to give a little TLC to any wedding celebration.

BRIDE-TO-BE SASH

There are plenty of ways to put all eyes on the bride-to-be at a bachelorette party – tiaras, shirts, sashes – the possibilities are endless! A bride-to-be sash is one of the most popular bachelorette accessories, but it can be difficult to find the perfect one. The solution? Make one! Sashes are fairly easy to make, and starting from scratch allows you to choose everything from the fabric to the decorative accents. Use burlap and lace to create a rustic chic sash for a weekend of wine tasting, or glitz it up with rhinestones and satin for a weekend in Vegas!
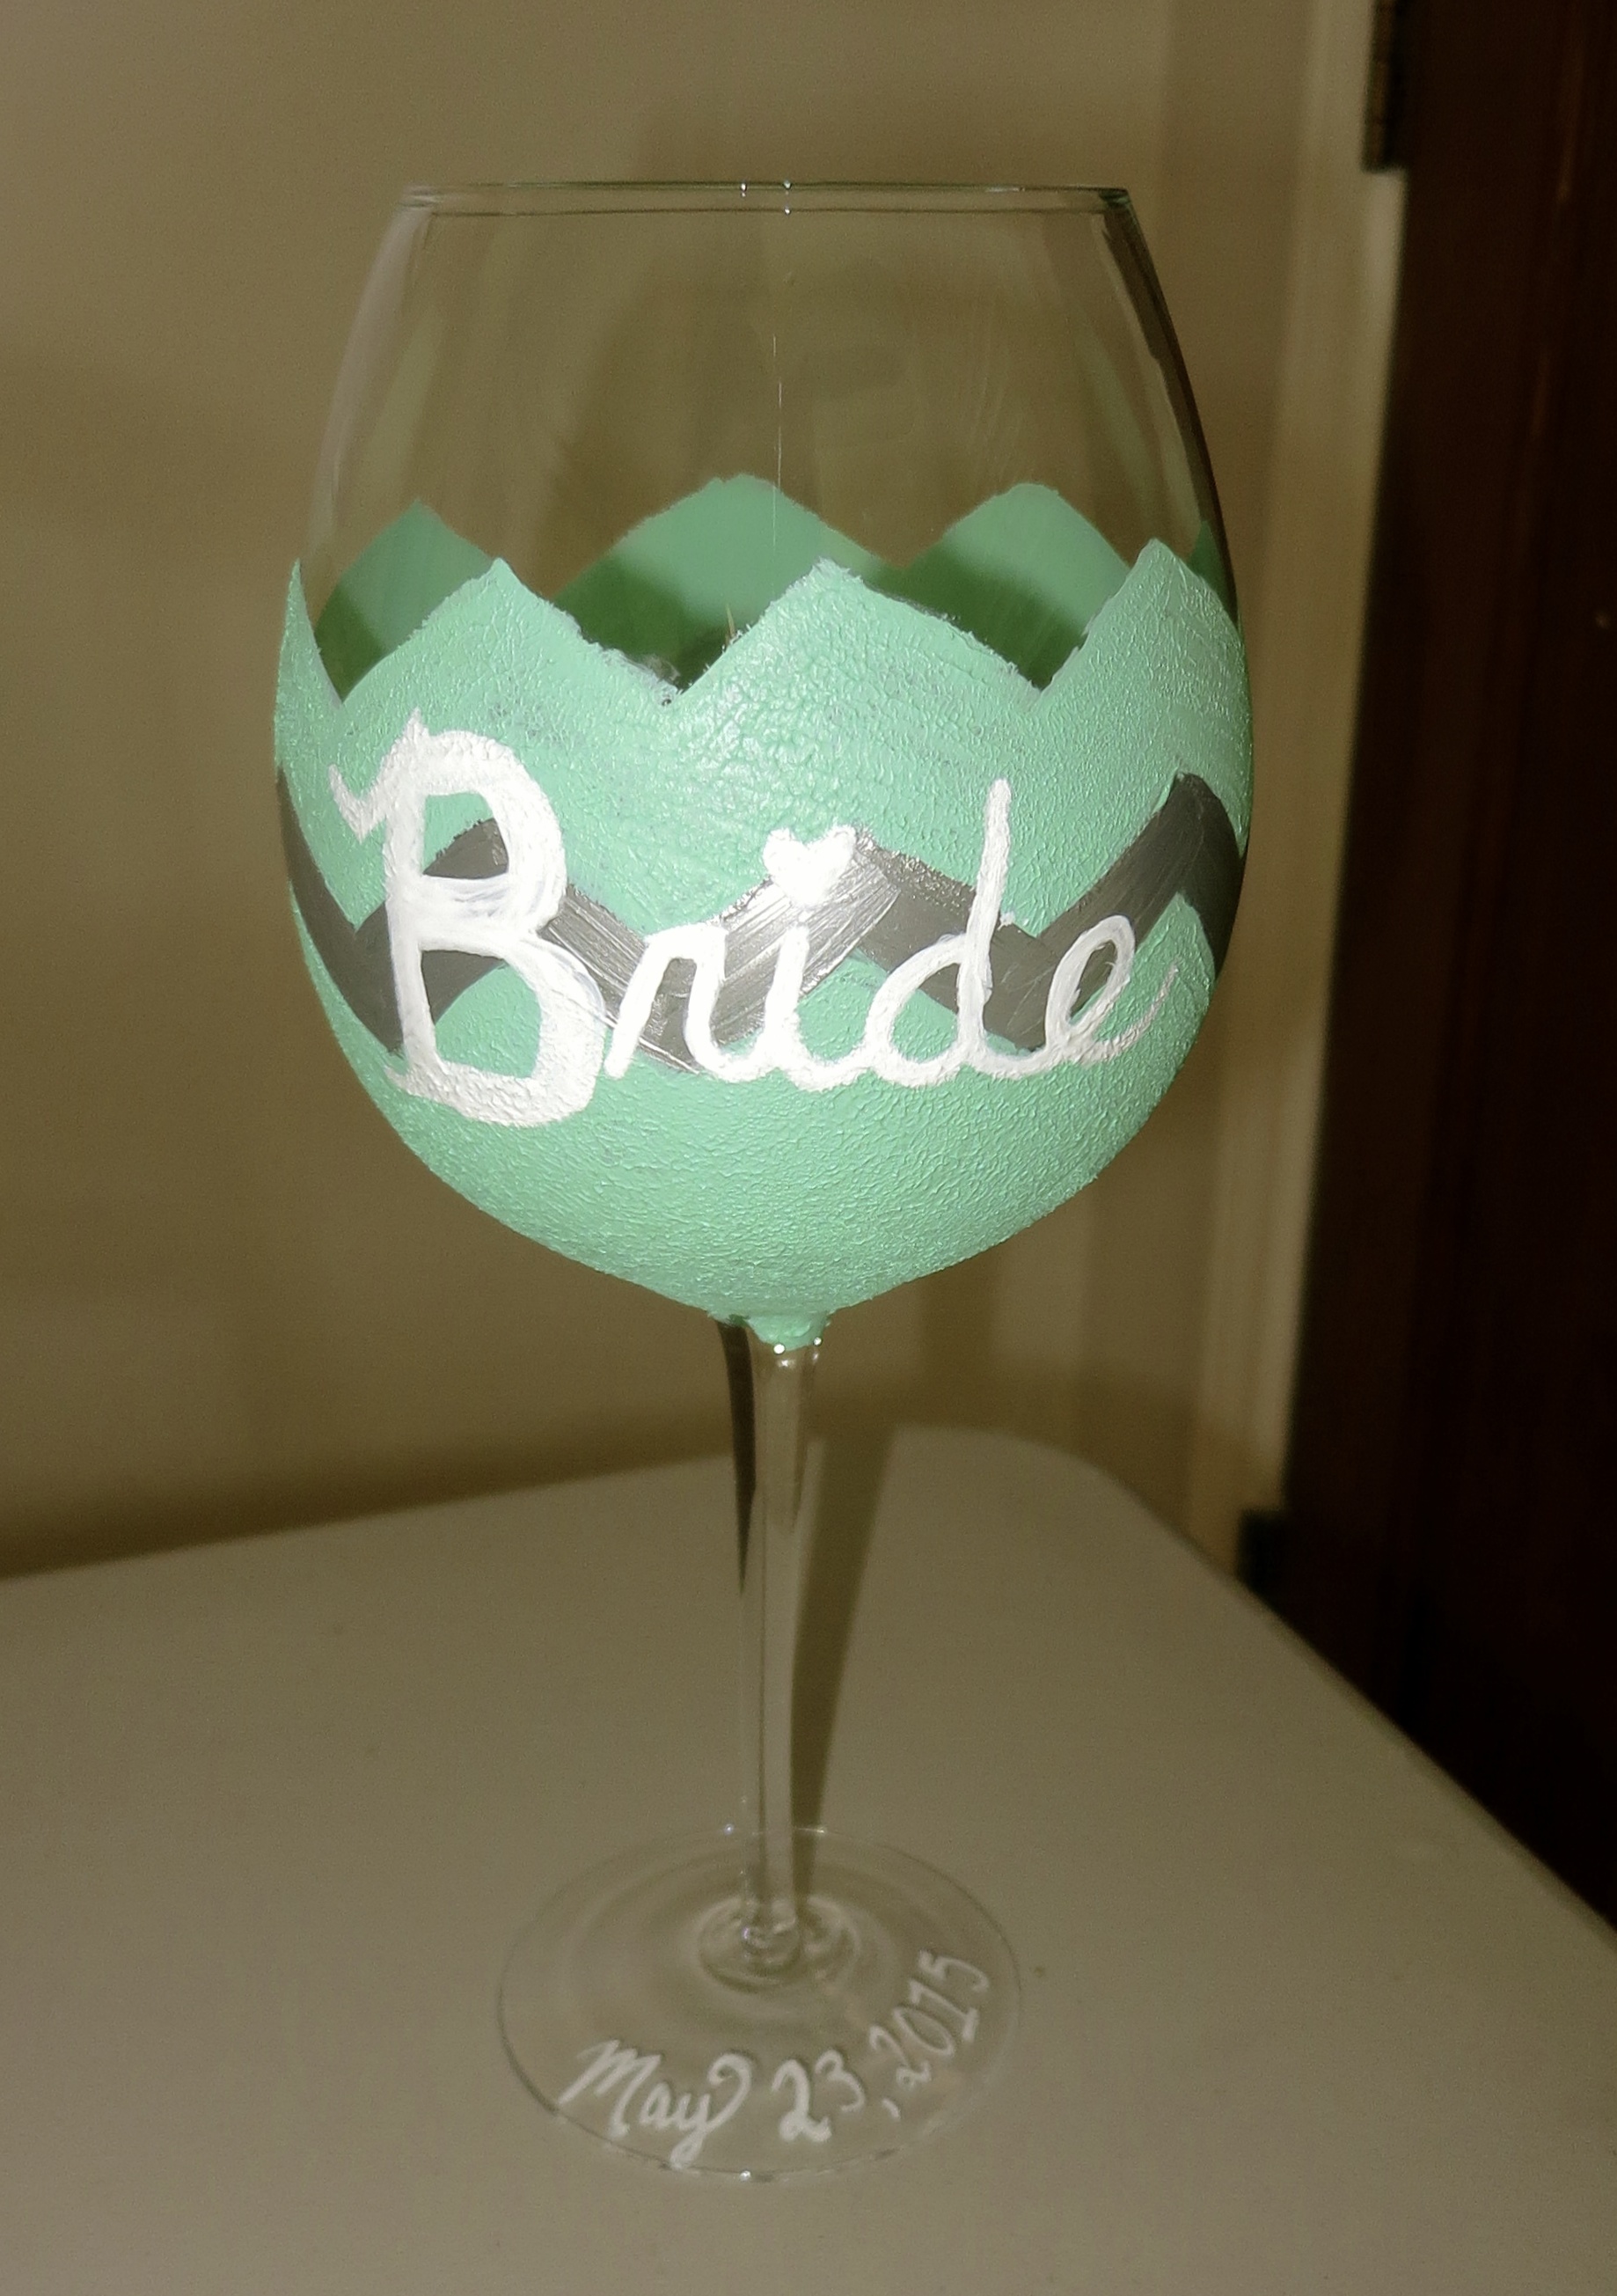
PAINTED WINE GLASS

At most bachelorette parties, there are bound to be games or activities that involve a beverage of choice for the bride-to-be. Painted wine glasses make great bachelorette gifts, and they are functional, too! Incorporate the bride’s wedding colors, wedding date, or even the silhouette of her dress (if you’ve seen it) to add a personal touch.

COWBOY HAT

Whether you are tearing it up in Nashville or line dancing at your local country bar, a veiled white cowboy hat can be the perfect addition to the bride-to-be’s décor. Use tulle to attach a veil to the hat, and decorate away! For this hat, I used burlap and lace ribbon as a hat band, and added stick-on letters and pearls to a painted wooden cutout for some extra pizzazz.

CHALKBOARDS

IMG_5082   IMG_5083

With both the bride and groom present, the newlywed game can be quite entertaining. Add a personal touch to the game by decorating chalkboards to match the theme of the celebration. For this Nashville bash, I used burlap ribbon, twine, and pearls to give the chalkboards a rustic chic look. If you’re feeling really crafty, you can even decorate erasers to match. Don’t forget the chalk!

MASON JAR JUGS

IMG_3964

To ensure the bride and groom are adequately “hydrated” during the festivities, serve their beverage of choice in personalized mason jars (large, plastic jugs in this case). As a base for the décor, I wrapped pieces of wide burlap ribbon around the jugs, attaching them with Velcro strips so they could be removed for washing. Fabric letters, twine, lace, and pearls were the perfect decorative accents to jazz up the jars. Let the games begin!
IMG_5136

WEDDING DAY EMERGENCY KIT

IMG_5719After months of bridal festivities, you’ve made it to the main event. Your friend and bride-to-be is getting married! A wedding day emergency kit can be a cute gift for the bride and her bridesmaids on her wedding day, and it can also come in handy should a zipper emergency or makeup mishap arise!

Painted Wine Glass

IMG_7820

How to paint a personalized wine glass:

What you will need: Wine glass, enamel paint, glass paint pen, paint brushes, paint sponges, oven

A painted wine glass can be a great personalized gift for a bride-to-be! Don’t have a bachelorette party on the horizon? Paint a set of wine glasses with different patterns or with the logos of your favorite sports teams to give your next party some flare. Who needs wine charms? For this project, I used a glass from Bed, Bath, & Beyond that supposedly holds an entire bottle of wine, but any glass will work! Before embarking on my wine glass painting adventure, I made sure to thoroughly wash and dry the glass so that there were no smudges or marks.

IMG_7780

Once I decided on my design, I used a thin paintbrush to start. It was clear after the first couple of strokes (shown below) that I would need multiple coats of paint to get an opaque finish. I continued with the paintbrush to create an outline of the style that I wanted (a chevron pattern, in this case) and let this first layer dry.

IMG_7781

I then used a paint sponge to apply a heavier layer of paint and to give the glass texture. After two rounds of sponge paint, the mint color was fully opaque. Be mindful of the type of paint you purchase, as some are meant to be opaque while others have a more translucent finish.

IMG_7783

Next, I created a silver stripe in the middle, again using the paint brush. For this section, I was able to create an opaque finish with the paintbrush, and I then painted the third layer in the same way as the first, using the sponge for heavier coverage and texture.

IMG_7786

Once this initial round of paint was dry (20 minutes or so), I went over all sections with a final layer of paint, using the sponge for the mint green sections and the paintbrush for the silver section. This final coat created the opaque finish I was looking for, so I set the glass aside to dry.

IMG_7789
A couple of hours later, I continued to decorate, using a paint pen to write ‘Bride’ in the middle of the pattern. Warning – Paint pens tend to have a mind of their own and can end up releasing more paint than you would expect (or like). To have more control over the amount of paint used, I created a light outline with the pen, and then traced over the letters using white enamel paint and a thin paint brush. I used the same tactic when writing the bride-to-be’s wedding date on the bottom of the glass.

IMG_7806

I let the finished wine glass dry for 24 hours, and then baked it to set the paint. If you are planning to set the paint in this way, make sure to use paint that can be baked, such as the enamel paint used in this how-to. To bake the glass, I placed it in a COOL oven, and turned it on to 350 degrees. This allowed the glass to heat slowly so it didn’t shatter (I was terrified). I then set a timer for 30 minutes from the time I placed the glass in the oven, and turned the oven off when the timer went off. I kept the oven closed for at least 30-45 minutes after turning the oven off to allow the oven and glass to cool slowly  (I may have peeked once before that because I was antsy), and then let the wine glass cool completely with the oven open to expedite the process. Although you can theoretically put glasses that have been treated in this way in the dishwasher, I would still recommend hand washing them.

IMG_7807

To add more bridal flare, I cut pieces of tulle that extended the length of the glass stem, and used a separate piece to secure them. To make washing the glass easier, I decided against using glue to permanently attach this decor. Keep this in mind when you are adding extra decorations to the glass!

IMG_7819

Once your glass is baked and any finishing touches are added, get some wine (or the bride’s drink of choice), and head to the party!

Wedding Day Emergency Kit

IMG_4636

How to pack the perfect wedding day emergency kit:

What you will need: Mason jar, batting, fabric, burlap, twine, chalkboard paper, chalk, emergency supplies

After the months of meticulous planning that precede a wedding, preparing for any mishaps on the big day is a must. You never know when a stray hair will rebel against your up-do or when waterworks will erupt during a speech! Wedding day emergency kits make cute gifts for the bride and her bridesmaids, and they are functional, too! After the wedding, turn the jar into a mini sewing kit (the top portion makes a great pin cushion) or keep it in your car for any on-the-go emergencies.

To start, I decided to create cushions for the tops of the mason jars to attach safety pins, because putting a handful in each jar just seemed too easy. To do this, I removed the metal disc from each mason jar cap, folded a small piece of batting on top of it, and covered it with fabric. To hold the padded disc in place, I put small dots of glue around the bottom of the cushion, near the metal disc, and pushed it back through the metal screw band, creating a protruding, padded surface.

IMG_5691 IMG_5695

I then glued any excess fabric to the back of each metal disc to create a flat surface, allowing the lids to properly screw back onto the jars.

IMG_5697To decorate, I wrote each bridesmaid’s name on a piece of chalkboard paper, and mounted it to burlap for a more rustic look. I used twine to tie a bow around each jar, and accented the bride’s kit with white lace as well!

IMG_5703

Once the jars were decorated, it was time to decide what we would need in the event of a “wedding day emergency”. Luckily we didn’t need most of the items shown below, but it’s always better to be safe than sorry!

IMG_5708

Bride-To-Be Sash

IMG_7798

How to make a personalized bride-to-be sash:

What you will need: Burlap with lace overlay (1.5 yards), cotton fabric (1.5 yards), cardboard letters, acrylic paint, lace trim (5-6 yards), embellishments, glue gun, sewing machine

Looking for a way to put all eyes on the bride-to-be at her bachelorette party? Follow the steps below to create a rustic chic bride-to-be sash, or choose fabric and embellishments that match your bachelorette party theme to create the perfect accessory for the big celebration!

IMG_7753

For this sash, I used burlap and lace to create a sash fit for a weekend of line dancing and wine tasting. I found a roll of burlap with lace overlay at Michael’s, and purchased plain white cotton fabric for the back side of the sash to make it more comfortable. To start, I cut two pieces of fabric from each material that measured around 1.5 yards long and 6 inches wide. I needed to make sure the sash was thick enough to fit the cardboard letters, and I cut the fabric approximately 1.5″-2″ wider than I needed to so that I had plenty of extra. Remember – trimming excess fabric is much easier than adding more!

IMG_7754

Once the fabric was cut, I held a piece from my shoulder to opposite hip to get an idea of the length I would need. You may need to shorten the sash to fit your bride-to-be, but again, “more is more” in the world of sewing, so don’t worry if you have extra! I then cut four pieces of lace trim, and pinned them to each side of the burlap (lace side up) so that the finished side of the trim was facing in.

IMG_7757

Once the lace was pinned in place, I pinned a piece of the white cotton fabric on top and placed pencil marks along the edge to ensure that the width was consistent throughout the length of the sash. Note – When you are sewing two pieces together to hide a raw seam, make sure that the right sides of the fabric (sides with the desired pattern/texture) are facing each other so that they show when the fabric is turned inside-out.IMG_7760

Once everything was pinned in place, I started to sew! I created a single seam on each side of the sash with my sewing machine, making sure the lace trim (sandwiched between the two pieces) was incorporated. I measured the distance between the two seams to replicate the width on the second piece, and turned the sash piece inside out.

IMG_7762
I repeated these steps with my second pieces of burlap, white fabric, and trim, and again turned this piece inside out. I then pinned the front and back pieces together to get an idea of sizing. I sewed the two pieces together at the top at a slight angle so that it rested comfortably on my shoulder, again making sure that the two lace sides faced each other so that the seam was hidden.

IMG_7766

For the bottom, I sewed the two pieces together at a more extreme angle so that the sash’s seam was parallel with my side, and voila! Time to decorate!

IMG_7771 IMG_7770

To give the cardboard letters a more bridal look, I painted them with white acrylic paint. Once they were dry, I glued them onto the sash using a hot glue gun. Warning – a couple of the letters started to fall off throughout the night, so I would recommend using a generous amount of glue instead of just a few dots on the edges of the letters. I then glued white flower accents to the sash, again with a hot glue gun, and set it aside for the bride-to-be!

IMG_7773 IMG_7790